IoT irrigation system
Introduction
Within the context of Smart Cities, urban orchards must also have their space and dedication. There are many people who are interested in having one of these orchards and who, due to various setbacks and difficulties, are forced to abandon the idea. This project is focused on eliminating the barriers that day-to-day impediments make our responsibilities with the maintenance of a certain plantation incompatible, offering an intelligent and remote irrigation system.
To carry out intelligent irrigation, it is necessary to know certain conditions of interest in our land, as well as be able to activate or deactivate the irrigation system conveniently. These tasks require the presence of the owner, unless there is a system in place that allows otherwise. With the proposed system, these monitoring and irrigation tasks could be carried out remotely from any point in the world, allowing users to maintain an orchard in their home while they are on vacation… All from their mobile phone!
On the market, there are already numerous and diverse products that seek to cover the same need as the one proposed here. In the vast majority of them, the device’s efforts are focused on programming the irrigation, proceeding automatically each time and thus completely ignoring all the data of interest that can be considered to make the appropriate decision and water intelligently. It should be noted that the solution achieved is not as simple as most of those that the market offers us and seeks to provide added value compared to its competition, providing a greater amount of information to the end user to decide how and when to water.
Objectives
As a summary, the main objectives pursued with the development of this project are the following:
- Allow the end user to monitor the relevant weather conditions of their urban orchard in real time, as well as view a historical record of them.
- Offer the possibility of turning the irrigation system on and off from the same monitoring platform.
Initial considerations
First of all, we will focus on the metrics to collect. Each of the metrics considered will be translated in the future into sensors to integrate. Taking into account the nature of the problem, applying common sense and after a brief investigation, the following were identified as the main ones:
- Temperature
- Terrestrial humidity
- Ambient humidity
- Precipitation
- LoRa: as it is designed for low-power devices.
- Sigfox: as we could take advantage of the cellular connectivity network.
- Wi-Fi: just the simplest and most popular.
- Node: responsible for receiving the signals from the deployed sensors, generating the message, sending it and receiving and executing actions on the irrigation system.
- Digital platform: intended to provide node monitoring data and manage the irrigation system.
Defining our components
We will start by presenting the composition of our node, getting to know the sensors, the actuator and the development board.
The integrated sensors were as follows:
- Environmental temperature and humidity sensor (DHT11): this sensor is capable of monitoring two different metrics simultaneously. It was decided to buy a module for Arduino, which comes prepared to work with 3.3V or 5V. Its output is digital and there are different libraries already implemented to work with it.
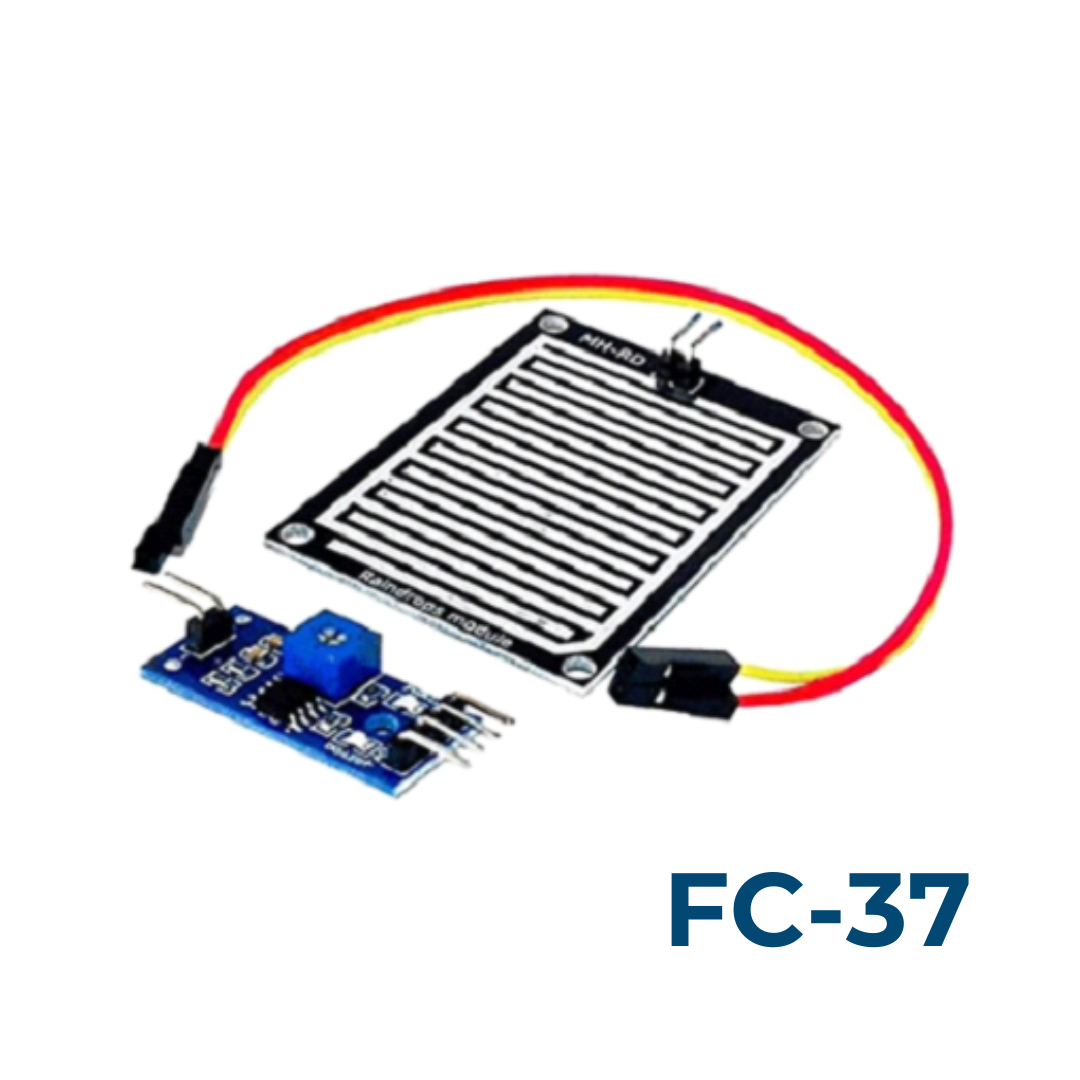
- Rain Sensor (FC-37): The FC-37 is intended to detect rain and provide an approximation of its intensity. Again we choose to integrate a module to minimize circuitry work and we can work with 3.3V or 5V. It has an analog output (amount of rain) and a digital output (whether it rains or not).
- Capacitive soil humidity sensor (CSM): this last sensor is responsible for monitoring the level of humidity present in the substrate in which our plants are located. This variant of the FC-28, a non-capacitive sensor but with the same purpose, is resistant to corrosion and therefore more durable. Once again we buy a module capable of working at 3.3V or 5V and its output is analog.


The final system should be able to adapt to different irrigation systems, but since we are developing a prototype, we can choose the simplest and cheapest equivalent actuator possible. With this, the selected actuator was a micro submersible water pump. This is capable of working at 5V thanks to the relay it includes and is more than enough for the tests we want to carry out.
As mentioned above, to power and control the various electronic components on display, a development board is required. In our case we work with Arduino UNO, a balanced and versatile development board. It has more than enough digital and analog pins for our project and its cost is acceptable. The only drawback is that it lacks Wi-Fi connectivity.


Now let’s dive into the the choice of the digital platform. Although it is true that the range of possibilities is very wide and that you could choose from a large number of different platforms, it was decided to work with the one that for me is the best for this type of use cases: Thingsboard. Thingsboard is a specialized platform for IoT projects that allows us to implement both monitoring and turning on and off the irrigation system. As already indicated in the previous section, in the future it would be convenient to seek to host this tool in the cloud, and Thingsboard itself has this service available.
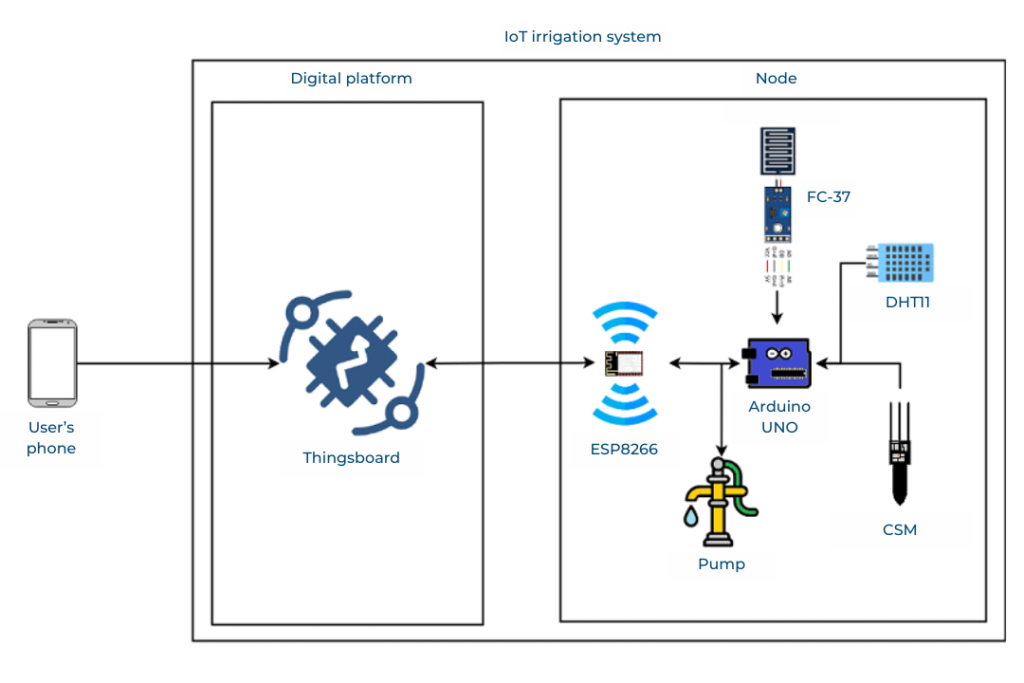
System diagram
With all of the above, our system could be represented as follows:
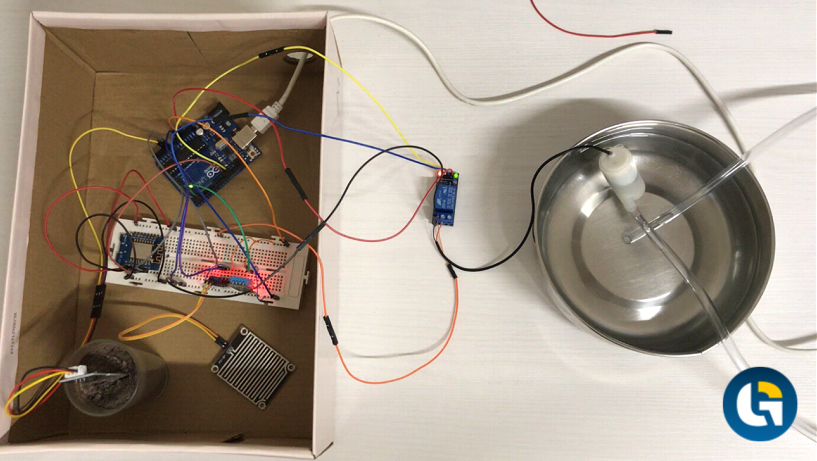
Prototype assembly
The assembly of the circuit was one of the first tasks carried out. Following the specifications of the manufacturers of our components, and using a breadboard to avoid soldering our circuit, we managed to assemble and make all the parts considered work. The result obtained is shown below:
Setting up the environment
The digital platform selected for the development of this project was installed on a local device. Along with Thingsboard, PostgreSQL was installed, necessary to deploy the relational database with which our platform works internally. To work, just start the service on the device used for it. Next, any user who wants to access it will do so through port 8080. Afterwards, all you have to do is create a user on the platform and that’s it.
Development: sensor reading
For each sensor a different strategy had to be followed. Each and every one of these are detailed below:
- DHT11: using its own library, it was only necessary to indicate the digital pin in which the sensor was housed and use its own methods.
- FC-37: using its analog output with values between 0 (maximum amount of rain) and 1023 (minimum amount of rain), a mapping was carried out to express this figure as a percentage. It should be noted that, to avoid noise and provide data that could lead to mistakes, any percentage less than 5% is replaced by 0%.
- CSM: the same strategy was used as with FC-37 but without performing any treatment to eliminate noise.
Development: Arduino UNO - ESP8266 communication
For communication between the development board and the antenna module used, its ports dedicated to serial communication (UART at 9600 baud) were used. To synchronize both devices, it was necessary to implement a communication protocol that efficiently guaranteed the consistency and integrity of the messages sent. It should be noted that this protocol only handles messages sent from the Arduino UNO to the ESP8266, since our need is unidirectional. On the Arduino UNO, once all the sensors have been read, a message is sent through the aforementioned port in CSV format.
At the other end, in the ESP8266, the connection had to be established to the Wifi access point and later to our Thingsboard service. This was achieved by using some bookstores specialized in it.
Once the connection was established, the message sent by the Arduino UNO was read and the telemetry was uploaded to Thingsboard. The protocol used first checks if there is anything to read in the serial. If there is, it begins to read the contents of its own buffer byte by byte and, when a comma or line break is found, it processes what has been read appropriately and sends the attribute in question to the digital platform.
The detailed protocol was tested and found to work perfectly even using sub-second times between iterations. For the tests carried out, these types of times are frequent, but for the final system, sending the telemetry every 10 minutes would be enough, since the weather conditions do not change so quickly.
Development: ESP8266 - Thingsboard RPC protocol
The management of the irrigation system is carried out thanks to a switch in Thingsboard that will be shown later. Behind, what communicates the status of the switch with the ESP8266 are Remote Procedure Calls (RPC). The connection of the antenna module and Thingsboard works with MQTT. By subscribing to the switch topic, every time there is an update these methods are executed and the system state is updated.
In the Thingsboard switch we have the following:
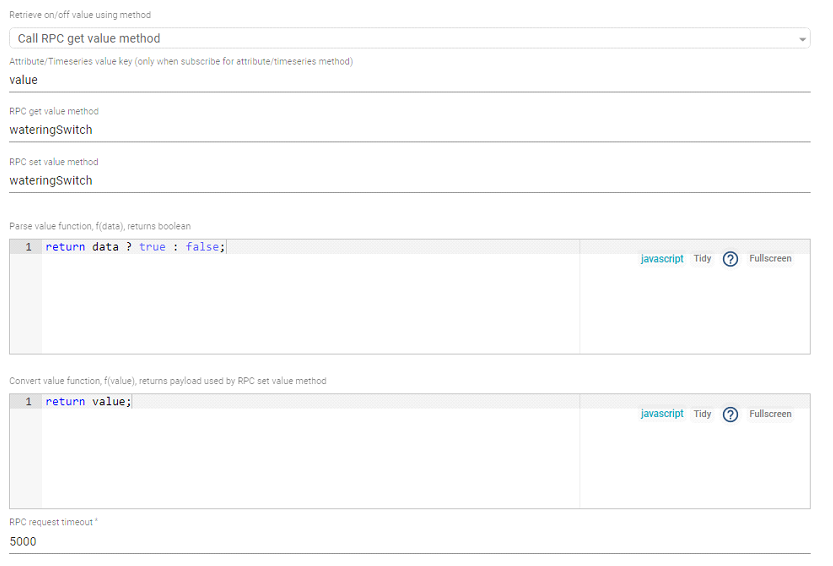
This is configured so that when the switch changes state, its associated boolean value toggles. When this value is requested, in our case when the ESP8266 is notified that it has changed state and requires it, it is returned without being modified. These tasks are carried out in the RPC, which we will refer to later.
At the other end, the ESP8266, the protocol logic began by implementing the method to manage the switch state change. This change of state was reflected in the output of the digital pin used as a messenger to the Arduino UNO, manager of the irrigation system.
Building the dashboard and historical graph
To build the necessary dashboard, the collection of widgets that Thingsboard brings with it was used and the following panel was created:
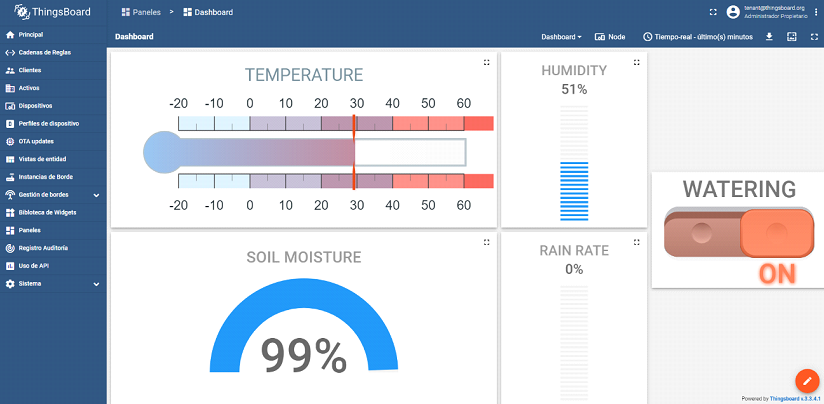
This offers the latest telemetry received from our prototype node, and is a perfectly valid result to meet the project objectives.
Even so, we could improve the efficiency of the system offering the user a historical chart of its status in recent days. To do this, we implemented another panel that shows the temporal evolution of the different metrics of interest collected. This is the following:
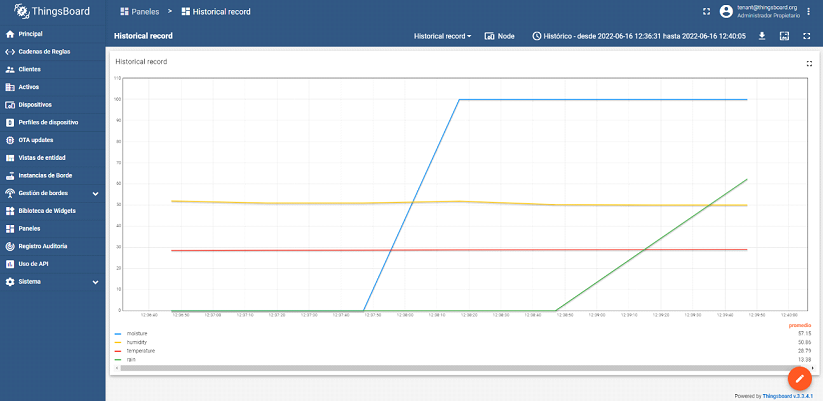
This facilitates the end user’s decision-making and helps them water intelligently, providing considerable additional value.
Ways for improvement
In a second iteration, the following could be enhanced:
- Design the node at the lowest electronic level to include what is strictly necessary and reduce its size. It would therefore be necessary to integrate a microprocessor, a Wi-Fi antenna, each and every one of the sensors detailed above and the necessary circuitry to couple all these components. In addition, this would have to come encapsulated and protected against possible shocks or corrosion.
- Another aspect to address would be the power supply of the node. Whether working connected to the current or with batteries, we should try to minimize its consumption. This could be carried out by integrating an energy harvesting module (for example, a small solar panel) and minimizing the functions of the node to the maximum when no action is required from it.
- Finally, we would have to migrate our system to a cloud platform. Everything indicates that Thingsboard’s own cloud would be the best option, but other providers such as Amazon Web Services or Microsoft Azure could also be considered.
Final assessment
Once the development of this prototype was completed, we can conclude that we had managed to achieve the objectives established at the beginning. The project has a lot of potential and numerous aspects could be improved. Even so, the result has been satisfactory. Not only was it fun to recognize, analyze and solve a market need, but also in the process we were able to learn numerous things that can be useful in future projects.